
Trim and Molding Installation in Broward County
In the world of interior design, trim, and molding are the unsung heroes that can elevate a room from ordinary to extraordinary. These architectural accents are more than mere decorative elements; they’re the last touches that blend form and function to create spaces that exude elegance and sophistication.
From classic crown molding to sleek baseboards, these features do more than just look pretty. They protect walls, hide imperfections, and can even cleverly conceal wiring. In Miami-Dade County and beyond, homeowners and businesses are discovering how the right trim can transform a space.
Installing trim and molding is both an art and a science. It requires precision, skill, and an eye for detail. Our expert installers combine time-honored techniques with modern tools to ensure every corner is crisp and every joint seamless. Thus, rooms that feel polished, complete, and thoughtfully designed.

Whether you’re renovating a charming bungalow in Broward County or putting the finishing touches on a modern high-rise in Miami, quality trim work can make all the difference. It’s an investment that pays off in both aesthetics and value, turning houses into homes and offices into showcases.
Types of Moldings and Skirting Boards: Enhancing Your Interior Design
When it comes to elevating your home’s interior, understanding the various types of moldings and skirting boards is crucial. These architectural elements not only add visual interest but also serve functional purposes in creating a polished, finished look.
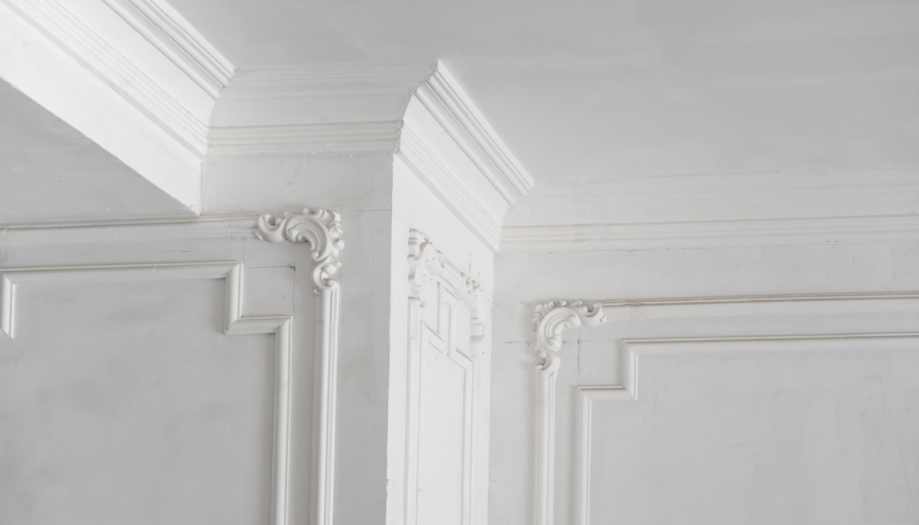
Crown Molding: The Ceiling’s Elegant Frame
Crown molding is a hallmark of refined interior design. Installed where walls meet the ceiling, it adds an elegant frame to any room. The precise installation of crown molding, especially at inside and outside corners, requires a keen eye and skill. Achieving seamless mitered corners demands the use of a compound miter saw. This tool is indispensable for cutting crown molding accurately. When tackling longer walls, the scarf joint technique ensures continuity and a flawless finish. Essential tools for this task include a miter box, power miter, nail gun, and coping saw.
Crown molding comes in various materials and styles. Wood is a traditional choice, offering a classic look. Medium-density fiberboard (MDF) is a cost-effective alternative that is easier to work with. Each type has its benefits and can be selected based on your interior design needs. Beyond basic crown molding, you can enhance your space with additional trim elements. Chair rail molding and picture frames add depth and interest to walls. Shoe molding provides a finished look at the baseboard level. These elements can transform a room, giving it a cohesive and polished appearance.
Crown molding is more than just a decorative element; it’s a statement of style and craftsmanship. Whether you’re enhancing a room or updating your interior design, crown molding adds value and beauty to your home. Embrace the art of crown molding installation, and transform your space with elegance and sophistication.
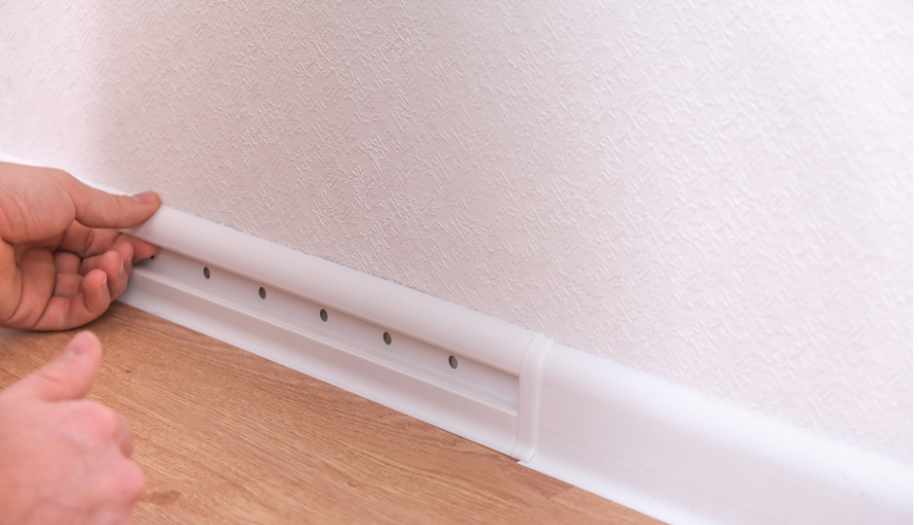
Baseboards: The Foundation of Wall Trim
Baseboards are the unsung heroes of interior trim, running along the bottom of your walls to provide a finished look while protecting against scuffs and dings. This essential element of trim installation serves as the foundation for your overall interior design. While wood trim installation for baseboards remains popular, many homeowners and general contractors now opt for medium-density fiberboard (MDF) due to its durability, cost-effectiveness, and ability to resist splitting.
Installing baseboards requires precision and the right tools. A miter saw is crucial for achieving perfect corners, especially where two walls confront. For a seamless look, professionals often use a special gun and nail set to secure the baseboards to wall studs, followed by wood filler to hide nail holes. Pairing baseboards with shoe molding creates a refined transition between wall and floor, while also concealing any gaps that might occur due to uneven flooring.
For those tackling a trim project as part of a larger renovation, consider coordinating your baseboard style with other trim elements like crown molding, door molding, and window trim. This cohesive approach to trim can transform your favourite room or entire house, elevating the overall aesthetic. Remember, whether you’re a DIY enthusiast with basic carpentry tools or hiring a trim installation company, attention to detail is key. From ensuring direct lines to making joints disappear, every step contributes to the polished, finished look that well-installed baseboards provide.
Chair Rail and Wall Molding: Adding Horizontal Interest
Chair rail molding, typically installed about a third of the way up the wall, adds a decorative horizontal element that can visually break up a large wall space. It’s particularly popular in dining rooms and home rooms. Wall molding, which can include decorative shadow boxes or picture frame-style designs, adds depth and character to plain walls.
Window and Door Trim: Framing Your Views and Entryways
Installing window trim and door molding is crucial for achieving a polished look around these openings. Casing trim comes in various styles to match your home’s architecture. During trim installation, focusing on precise mitered corners and using a nail gun for secure attachment ensures a professional finish.
Proper trim installation is essential for enhancing the aesthetic appeal of windows and doors. Using a compound miter saw, you can achieve accurate cuts for corners. Secure the trim with a nail, ensuring it attaches firmly to the wall stud. Hide holes from nails with wood filler and lightly sand the surface for a smooth finish.
Choose from a range of trim molding styles to complement your interior. Crown molding baseboards, and chair rail molding, add decorative elements to your spaces. For a seamless look, ensure all cuts are precise and corners fit perfectly. Installing trim around windows and doors not only frames your views and entryways but also enhances your home’s overall interior design. By paying attention to all the details and using the right tools, you can achieve a seamless look that adds value and elegance to your home.
Finishing Touches: Making Your Trim Work Shine
After installation, the final steps involve hiding nail holes with wood filler or wood putty, and lightly sanding joints to make them disappear. These finishing touches are what separate a DIY project from professional-looking work.
For those embarking on a trim project, whether in a single room or throughout the entire home, it’s essential to consider the overall design aesthetic. The right molding can enhance your space, while mismatched styles can detract from it. Professional installation ensures that all the details, from 45-degree corners to seamless joints, are executed flawlessly.
A Comprehensive Guide to Installing Ceiling Cornices and Skirting Boards
4 Steps of Ceiling Cornice Installation
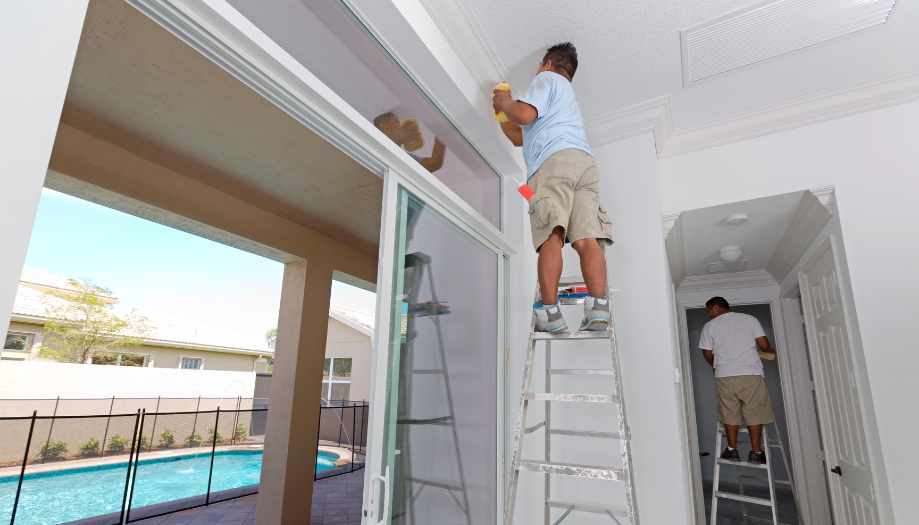
Elevating the aesthetic appeal of any room can be achieved through the installation of ceiling cornices, which create an elegant transition between walls and ceilings. This sophisticated project demands precision in trimming, including the meticulous cutting of vertical pieces and the seamless blending of joints using advanced techniques.
Whether opting for medium-density fiberboard or alternative materials, this ceiling cornice installation guide offers a cost-effective and time-efficient approach to home improvement. The process begins with accurate measurements and cuts, ensuring each piece fits perfectly within the room’s dimensions.
To ensure a secure installation, utilize a stud finder to locate wall supports. This step is crucial when working with heavier materials or in older homes with potentially uneven surfaces. For a professional finish, consider using a high-quality cornice adhesive, which provides strong bonding and allows for adjustments during the installation process.
This comprehensive tutorial covers every aspect of cornice installation, from preparing the existing ceiling surface to applying the final coat of paint. For those looking to cover outdated or damaged ceilings, cornices offer an elegant solution that can completely transform the space.
The project may seem daunting, but with proper guidance, installing ceiling cornices yourself is achievable. This step-by-step guide walks you through each phase, from initial measurements to the end ones, including tips on lightly sanding for a flawlessly smooth finish.
- Preparation: Proper preparation is crucial for a successful crown molding installation. Begin by measuring the room carefully. Use a stud finder to locate and mark wall studs, which will ensure secure attachment. For cutting crown molding pieces, a power miter saw is invaluable. It allows for precise angle cuts, especially important for the compound miters needed in crown molding work.
- Handling Corners: Corners are often the trickiest part of crown molding installation. For inside corners, the coping technique is preferred by professionals. Using a coping saw, carefully cut along the profiled edge of one piece to fit perfectly against the face of the adjoining piece. For outside corners, cut at 45-degree angles for each piece, ensuring they fit together seamlessly.
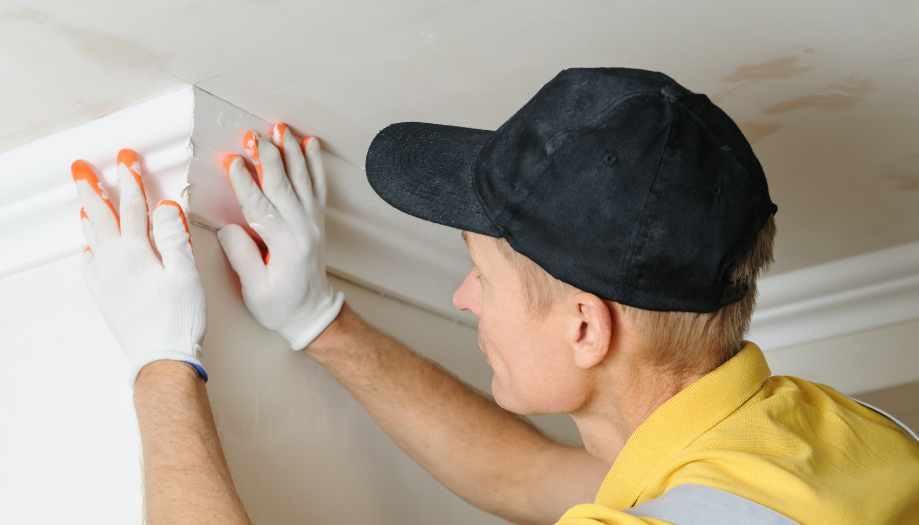
- Installation: Begin the installation process by applying a high-quality adhesive to the back of the cornice. This provides additional support and helps prevent gaps over time. Use a pneumatic nail gun to secure the molding to wall studs and ceiling joists. This method is faster and more precise than hand-nailing. For long walls where two pieces of molding must meet, create scarf joints. These angled joints distribute the connection over a larger area, making the seam less noticeable.
- Finishing: The completion make all the difference in professional-looking trim work. Fill nail holes with wood putty, matching the color to your molding. Caulk any gaps between the molding and the wall or ceiling for a seamless appearance. Once dry, lightly sand the filled areas and caulk lines. Finally, paint the molding to match your décor, blending it perfectly with your design.
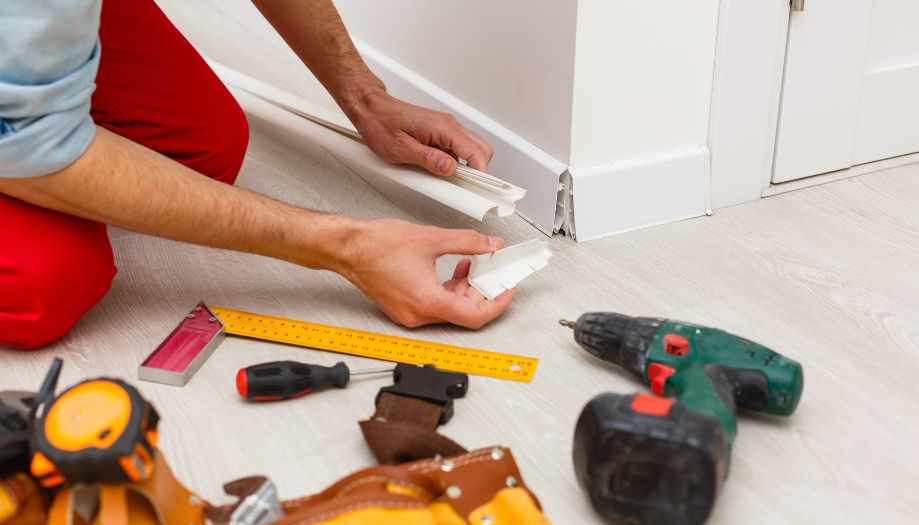
4 Steps of Skirting Board Installation
Enhancing your interior design and safeguarding walls can be efficiently achieved through the installation of skirting boards. This process, applicable to both medium-density fiberboard and traditional wood, involves a series of precise steps to ensure straight lines and a flawless aesthetic.
This comprehensive guide to skirting installation encompasses essential techniques, from utilizing a stud finder to locate wall studs, to applying the finisher with a nail set and light sanding for a smooth finish. These methods guarantee that your decoraive work is not only visually appealing but also durable.
Begin by accurately measuring your space, paying particular attention to corners, both internal and external. For precise cuts, especially at angles, a miter saw proves invaluable. When fixing skirting to the wall, choose between adhesive for a clean look or drill and screws for added security, depending on your wall type (e.g., plaster or drywall).
For a professional finish, consider using a drill bit slightly smaller than your fixings to prevent splitting. When installing skirting boards against walls, ensure they’re level and flush. For those in Lake Zurich or beyond engaging in remote shopping for materials, carefully consider the board style that best complements your space.
Whether you’re renovating a family room or tackling a whole-house project, this step-by-step guide to installing skirting will help you achieve results that rival professional craftsmanship. With attention to detail and the right techniques, your DIY skirting project can transform any space into a polished, well-finished area.
- Preparation: If you’re replacing existing baseboards, carefully remove them to avoid damaging the wall. Measure and mark the height of the new skirting board on the wall, ensuring consistency throughout the room. Use a miter saw for cutting boards to length. This tool is essential for achieving the precise straight cuts and angled cuts needed for corners.
- Installation: Apply a strong construction adhesive to the back of the board. This helps prevent gaps and provides additional support. Nail the board to the wall, checking with a level frequently to ensure it remains straight. Use a nail set to countersink nails slightly below the surface of the wood. This allows for a smooth finish when the nail holes are filled later.
- Corners and Joints: For internal corners, use a coping saw to create a tight fit. This technique involves cutting one board straight and coping the adjoining board to fit its profile. For external corners, miter the boards at 45-degree angles for a clean, professional look. On long walls where two boards need to meet, use scarf joints. These angled joints provide a stronger, less noticeable connection than butt joints.
- Finishing: Fill all nail holes and any small gaps with wood filler. Once dry, sand the filled areas until smooth, blending them with the surrounding wood. Caulk the top edge where the skirting meets the wall to prevent dust accumulation and provide a clean line. Finally, paint or varnish the skirting boards to match or complement your room’s décor.

Remember, while this guide provides a comprehensive overview, crown molding and baseboard installation can be challenging, especially for those new to trim work. Rooms with uneven walls, non-square corners, or complex angles present additional difficulties. For the best results, consider hiring a professional trim installation company. Their expertise with interior trimming work can save time, prevent costly mistakes, and ensure a polished, professional finish that truly enhances your home’s interior.
By following these steps or enlisting professional help, you can transform your space with beautiful crown molding and skirting boards, adding value and sophistication to your home.
Signs You Need Trim and Molding Installation
Recognizing the signs that you need trim and molding installation can significantly enhance your home’s aesthetic and structural integrity. Whether you’re noticing gaps where two walls contact, uneven edges along your main wall, or a lack of straight lines in your design, installing crown molding and trim work can provide a seamless look and add value to your living spaces. From your family room to hallways, incorporating elements like vertical pieces, shadow boxes, and trim molding not only beautifies your home but also saves money in the long run by protecting your walls and avoiding damage.
Our pros at Handyman Services Steel-Gates have prepared some tips to determine when it is time to install trim and molding:
| Sign | Description |
|---|---|
| Uneven joints between walls and ceiling or floor | Moldings and baseboards help conceal irregularities and gaps, giving the interior a neat and finished look. |
| Damaged corners and edges of walls | Corner moldings protect wall corners from damage and wear. |
| Desire to improve the interior aesthetics | Installing decorative elements such as cornices and baseboards enhances the overall look and style of the room. |
Reasons for Trim and Molding Installation
Installing trim and molding is a fundamental aspect of interior design, offering both aesthetic and practical benefits. Crown molding installation, for instance, adds a sophisticated touch to any room, creating a seamless transition where walls meet the ceiling. Interior trim installation, including chair rail and wall molding, helps define spaces and adds architectural interest. These elements can transform a plain room into a polished and cohesive living space, enhancing both visual appeal and property value.
- Improving Appearance – moldings and baseboards add decorative accents that make the interior more stylish and finished.
- Protecting Walls and Corners – these elements protect the corners and lower parts of the walls from mechanical damage and wear, extending the life of the finish.
- Concealing Defects – moldings and baseboards help hide irregularities, gaps, and other minor defects, improving the appearance of rooms.
- Functionality – baseboards can be used to conceal wires and cables, providing a more neat and safe look.
Trim installation serves practical purposes. For example, wood trim installation around doors and windows, known as casing trim, helps hidel holes and protect the edges of the openings. Mitered corners and scarf joints ensure that pieces fit perfectly, avoiding gaps and making joints disappear. Using basic tools like a miter box and coping saw, along with advanced tools such as a power miter and air compressor, ensures precise cuts and a durable finish. Properly installed trim and molding not only look beautiful but also contribute to the structural integrity of your home.
In addition to these benefits, molding installation can save money in the long run by preventing wall damage and minimizing maintenance needs. For instance, crown molding baseboards and shoe molding protect walls from scuffs and dents. Trim work, when done correctly, also adds to the longevity of your home’s interior, making it a worthwhile investment. Whether you’re embarking on a trim project in a room or throughout your entire home, attention to all the details, such as inside corners and outside corners, will result in a seamless look that elevates your interior.
Case Stories

Client Story: Installing Moldings in a New House
After purchasing a charming new home in Broward County, the Ramirez family felt their space needed that extra touch of elegance. They reached out to the experts at Handyman Services Steel-Gates for guidance. Our specialists worked closely with the family, helping them select the perfect moldings to complement their home’s architecture and personal style.
The project included installing crown molding in the spacious living room and master bedroom, adding sophisticated chair rails in the dining area, and fitting sleek baseboards throughout the house. Our skilled team executed the installation with precision, ensuring every corner was perfectly mitered and each joint seamless.
The transformation was remarkable. What was once a pleasant but plain interior now exuded refinement and character. Mrs. Ramirez couldn’t contain her excitement, saying, “It’s amazing how these moldings have elevated our home. Every room feels more polished and complete. The attention to detail from the Handyman Services Steel-Gates team was impressive – they’ve truly turned our house into our dream home.”
This project showcases how the right moldings, expertly installed, can dramatically enhance a new house, turning it into a personalized, sophisticated living space.
Customers’ Review
Numerous clients leave positive reviews about the quality of trim and molding installation services from Handyman Services Steel-Gates, noting the professionalism of the craftsmen, promptness, and high quality of materials.
“I recently had Steel-Gates install trim and molding in my living room and dining room, and I couldn’t be happier with the results. The team was incredibly professional, arrived on time, and completed the job efficiently. The quality of the materials and the precision of the installation exceeded my expectations. I highly recommend their services!”
John Mitchell, Pompano Beach
“We hired Handyman Services to install baseboards and crown moldings in our new home. From the initial consultation to the final touches, their attention to detail was impeccable. The installers were friendly and knowledgeable, and they took great care to ensure everything was perfect. Our rooms now look elegant and finished. Thank you for the fantastic job!”
Emily Thompson, Fort Lauderdale
“Handyman Steel-Gates did an outstanding job installing corner moldings and baseboards in our office. The team was very professional and worked quickly without sacrificing quality. The finished product looks amazing and has greatly improved the overall look of our space. I am very pleased with their work and would definitely use their services again.”
Michael Davis, Miami Dade County
Expert Opinion
An interview with an experienced craftsman from Handyman Services Steel-Gates a local handyman service near me sheds light on common challenges and effective solutions for trim and molding installation. The craftsman emphasizes the importance of selecting the right materials, preparing surfaces meticulously, and taking accurate measurements for quality results.
While basic carpentry tools like a miter box and stud finder can help you get started, more complex trim work, such as installing trim and wall molding, often benefits from the expertise of a general contractor or a specialized trim installation company. These professionals have the skills and advanced tools, like power miters and air compressors, to ensure your trim installation is precise and durable.
By carefully selecting and professionally installing various types of moldings, such as crown molding, chair rails, and skirting boards, you can transform your space. Thoughtful trim work can hide nail holes and add decorative elements like picture frames, enhancing both the value and visual appeal of your home. Whether updating a living room or refreshing your entire interior, expertly installed trim creates a cohesive and elegant living space.
Trim and molding installation in Broward County is an important process that helps improve appearance, protect walls and corners, and conceal minor defects. Quality installation of these elements gives the interior a finished and stylish look.
For quality trim and molding installation, contact the professionals at Handyman Services Steel-Gates, who can help you quickly and efficiently solve all problems. Our specialists have extensive experience and use only. We offer our services 24/7 and are available in Pompano Beach, North Miami, Hollywood, Dania Beach, Hallandale, Fort Lauderdale, and more.
Trim and Molding Installation Broward County Aria

Trim and Molding Installation Miami Dade Aria
